
Recapitulating AF_XDP
Hey Folks,
this time I will talk about a pretty awesome feature in the Linux kernel: AF_XDP. Please keep in mind, that this is a summary and explanation in my own words, and it’s not intended to fully cover all technical depths. The focus lies on understanding AF_XDP’s core concepts, learn how to use it, and what to consider while using it.
The official kernel documentation describes AF_XDP as “an address family that is optimized for high performance packet processing”. Quite interesting, so let’s start at the very beginning, why do we need an additional address family (or in other words an additional type of network socket)? Reading this sentence from the doc implies, that the existing address families are not suitable for high performance networking. And that’s exactly the case. While the Linux networking stack does a really good job abstracting layers from applications, it suffers performance due to exactly these abstractions. That’s why other libraries like DPDK completely bypass the kernel networking stack with their so called Poll Mode Drivers (PMD). This is very, very fast, reaching line rate for 100Gbit/s NICs. But this performance comes with some drawbacks: DPDK code is difficult to maintain, there is no chance to benefit from any kernel functionality (e.g. existing networking drivers), the number of supported NICs is limited and smaller than by the kernel, and PMD drivers completely block each used core to 100%.
Consequently, getting some functionality in the Linux kernel that allows high-performance packet processing sounds pretty awesome. At first, there is one important thing to name which sometimes confuses people: AF_XDP is not a kernel bypass, like DPDK, it’s a fastpath inside the kernel. This means, e.g. normal kernel networking drivers are used. After clarifying this important difference, let’s dig into AF_XDP to see how it works and what we need to consider.
Note: For deep explanations of all used concepts, please visit the kernel documentation, it’s really great! A complete working program and tutorial can be found here.
In the mentioned kernel documentation, the authors assume that the reader is familiar with bpf and xdp, otherwise pointing to cilium docs as reference. However, I think it’s important to mention how these two things work together with AF_XDP, to understand how AF_XDP differs from e.g. DPDK. XDP itself is a way to bypass the normal networking stack (not the whole kernel) to achieve high performance packet processing speeds. eBPF is used to run verified code in the kernel on a set of different events, called hooks. One of these hooks is the XDP hook. An eBPF program using the XDP hook gets called for every incoming packet arriving at the driver (if the driver supports running eBPF), getting a reference to the raw packet representation. The eBPF program can now perform different tasks with the packet, like modifying it, dropping it, passing it to the network stack, sending it back to the NIC or redirecting it. In our AF_XDP case, the redirecting (XDP_REDIRECT) is the most important action, because it allows to send packets directly to userspace. The following figure shows the flow of packets using a normal socket and AF_XDP.
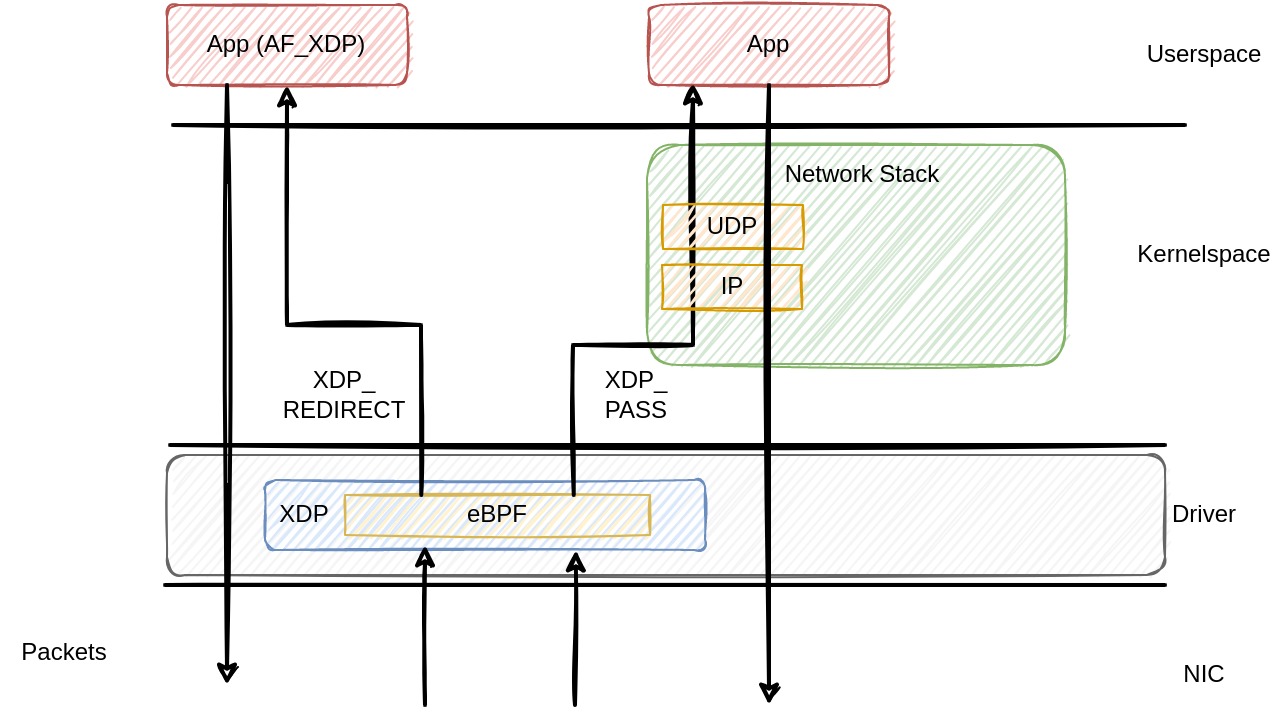
After being received by the NIC, the first layer the packets pass is the networking driver. In the driver, applications may load eBPF programs using the XDP hook to perform the actions explained above. In AF_XDP, the eBPF program redirects the packet to a particular XDP socket that was created in userspace. Bypassing the Linux networking (Traffic control, IP, TCP/UDP, etc), the userspace application can now handle the packets without further actions performed in the kernel. If the driver supports ZEROCOPY, the packets are written directly into address space of the application, otherwise, one copy operation needs to be performed. In contrast to AF_XDP, packets targeted to normal sockets (UDP/TCP) traverse the networking stack. They can either be passed to the stack using XDP_PASS or there is no eBPF program using the XDP hook, and packets are forwarded directly to the networking stack.
Now let’s consider the backwards direction. In AF_XDP, packets can be passed directly to the NIC driver by passing a block of memory containing them to the driver, which then processes them and send them to the NIC. On the other hand, normal sockets send packets using syscalls like sendto, where the packets traverse the whole networking stack backwards. On the outgoing side, there is no XDP hook that can be attached using eBPF, so no further packet processing here.
Note: Please consider that there are some SmartNICs that also support running XDP programs directly on the NIC. However, this is not the common case, therefor the driver mode is focused here.
In the previous section, we saw how packets flow until they arrive at our application. So now let’s look at how AF_XDP sockets read and write packets from/to the NIC driver. AF_XDP works in a completely different way from what we already know about socket programming. The setup of the socket is quite similar, but reading and writing from/to the NIC differs a lot. In AF_XDP, you create a UMEM region, and you have four rings assigned to the UMEM: RX, TX, completion and fill ring. Wow, sounds really complication. But trust me, it’s not. UMEM is basically just an area of continuos virtual memory, divided into equal-sized frames. The mentioned 4 rings contain pointers to particular offsets in the UMEM. To understand the rings, let’s consider an example, shown in the next figure.
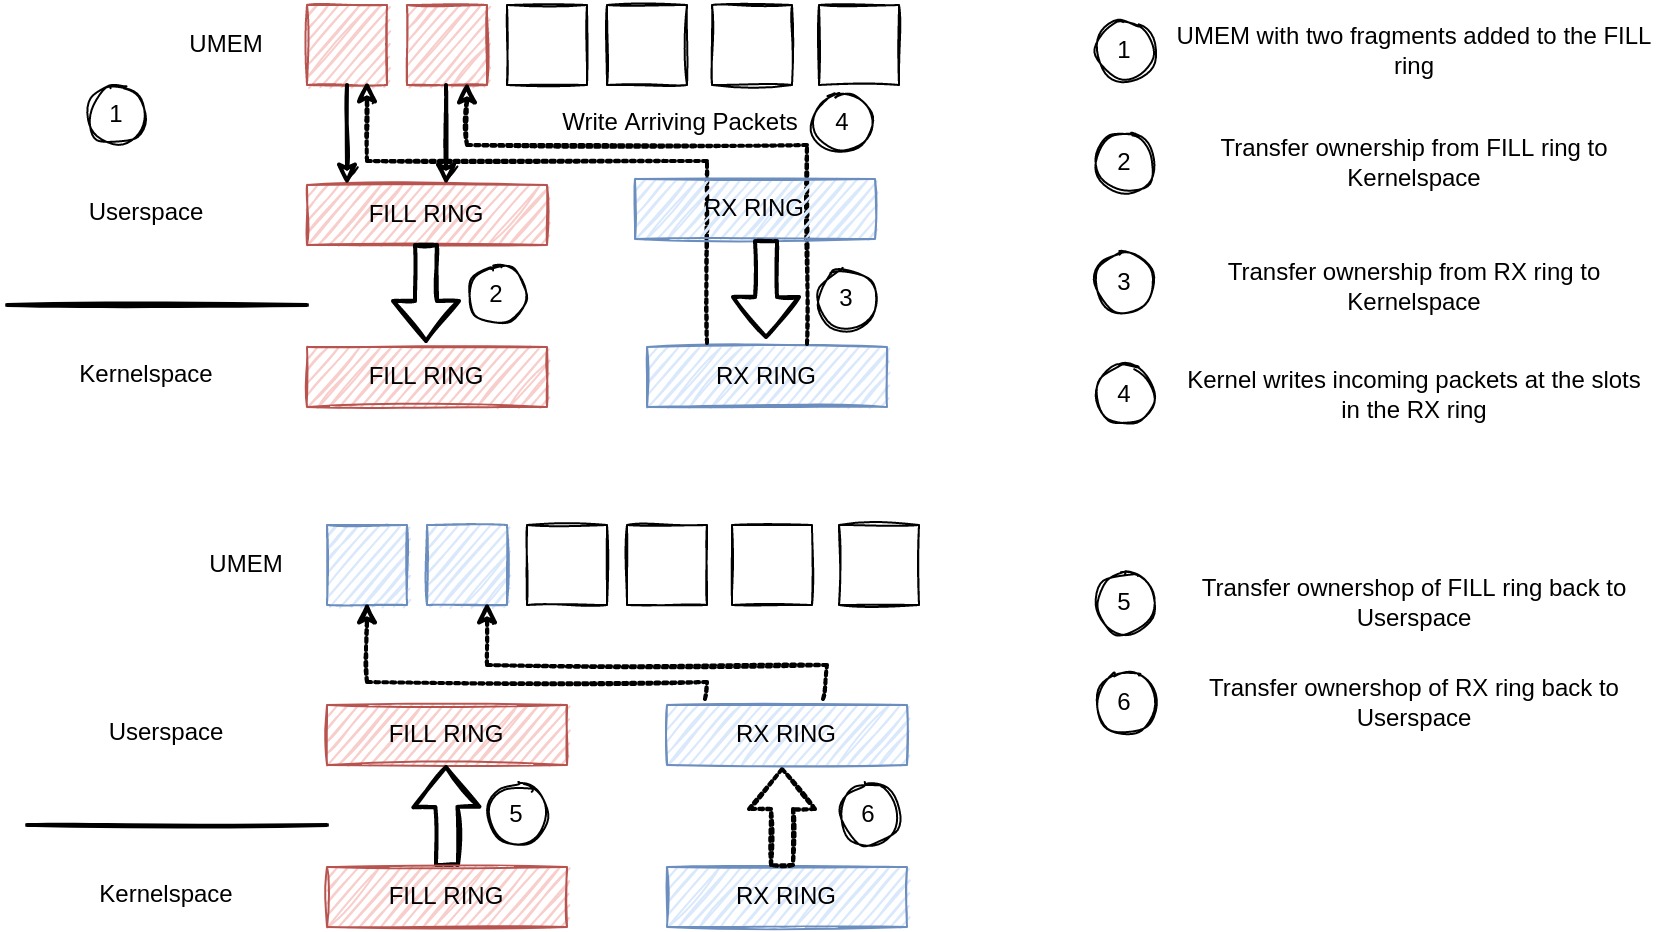
This figure covers the reading of packets from the driver. So we produce UMEM addresses to the fill ring, meaning we put some slots of our UMEM into the fill ring (1). Afterwards, we notify the kernel: Hey, there are entries in our fill ring, please write arriving packets there. After passing the fill ring (2) and the rx ring (3) to the kernel, the kernel writes packets at the slots we produced beforehand (4) to the rx ring. We can now fetch new packets using the rx ring, after the kernel gives us back both rings (5) (6). The rx ring contains packet descriptors in the slots we passed via the fill ring to the kernel, in case there were packets that arrived. Great, we can now handle all of our packets, and then start again putting some references in the fill ring, and continue the same reading packets from the NIC.
To send packets via the NIC, the remaining two rings are used, in a similar way seen before on the receive side. We produce packet descriptors to the tx ring, meaning we put some references to our UMEM into the tx ring. Once we filled the ring, we pass it to the kernel. After the kernel transferred the packets, the respective references are filled into the completion ring and our application can reuse the slots in the UMEM.
In summary, using AF_XDP, we get a pretty awesome tradeoff between using existing code of the kernel (NIC drivers) and gain high performance for packet processing. I hope this article gives you at least an idea of how AF_XDP works, and I will try my best to continue with an article focusing of the actual usage of AF_XDP and potential pitfalls.
As always, please mail me any feedback you have, I really appreciate any kind of comments or additional information, and I will update this article with any helpful input I get.
Cheers, Marten
Further Resources:
- https://www.kernel.org/doc/html/latest/networking/af_xdp.html?highlight=af_xdp
- https://docs.cilium.io/en/latest/bpf/
- https://www.youtube.com/watch?v=9bbdhnbVbDk&ab_channel=FOSDEM
- https://www.youtube.com/watch?v=Gv-nG6F_09I&t=1417s&ab_channel=RustDC
- http://vger.kernel.org/lpc_net2018_talks/lpc18_paper_af_xdp_perf-v2.pdf